User Guide – Network SSL Certificate Scanner 2019
Contents
- About
- Benefits
- Requirements
- Installation
- How to Use?
- Right Click Menu Options
- Settings
- SSL Certificate Scan Report
- Advanced Feature – SSL Certificate Security Analysis
- Special Feature – Automatic Storing of Database
- How to Use Command-line Version?
- Automation of SSL Certificate Scan
- Contact XenArmor
About
 XenArmor NetCertScanner (Network SSL Certificate Scanner) is the enterprise software to find find all expiring/self-signed/vulnerable/rogue SSL certificates in your local network or internet. It’s swift SSL Certificate scan powered by ‘Host-Port Multiplexed Multithreading’ technique helps you to scan the entire network in just few minutes.
It also help you to save precious time by fully Automating your daily/weekly SSL certificate scanning operations with all the scan results automatically stored to local database and view the same later on-demand.
Benefits
Here are the main benefits for you,
- Faster SSL Certificate Scan: Helps you to Scan local Network in few minutes
- Fix SSL in time: find & fix expiring SSL certificates months before expiry
- One Click Network Scan: Perform SSL scan of your whole local network (256*256 Hosts or *.*.0.0/16) in one go
- Custom SSL Port Scan: Supports standard (HTTPS/LDAPS) as well as SSL Services running on custom port
- Automation of SSL Certificate Scan: Fully Automate your SSL scan with all results stored to Database
- Email SSL Scan Report: Get full report of SSL scan delivered to your Email
- Vulnerable SSL Certificate Analysis: Detect Expired, Expiring soon, Self-signed & Vulnerable Certificates
- Supports All Certificates: detects over 300 types of new SSL ciher suites/certificates
- SSL SNI Support: Scan domains/websites hosted on shared IP address
- SSL Scan Report: Generate SSL scan report in HTML, CSV, XML, JSON, SQLite file format
- Multi-Colored Result Display: Shows SSL scan results in multi-colors for quick identification of problems
- Online SSL Analysis: Perform detailed SSL certificate analysis online
- Database Store: Store every scan results to Database automatically & load it later on demand (no setup required)
- Command-line Version: Great for Automation and to integrate within your scripts
- File Domain/IP List Scan: Save time with smarter File based IP/Domain list scanning of known hosts
- View SSL Certificate: Quickly view or download selected SSL certificate after the scan
- Hidden SSL Discovery: Custom brute-force scan to find any rogue/hacker planted SSL services in your network
- Perfect for Auditing: Perform Auditing anytime with local database having all SSL scan results
- Supports All Windows: It works on all 32-bit & 64-bit platforms from Windows XP to new Windows 10
Requirements
XenArmor NetCertScanner works on both 32-bit & 64-bit platforms starting from Windows XP to Windows 10.
Here are the specific details,
- Installation Size: 15 MB
- RAM: 4 GB+ Recommended
- Operating System: Windows XP, Vista, Windows 2008/2012/2016, Windows 7/8/10.
Note: Mobile/pads/non-windows devices not supported
For better & faster SSL scan performance we recommend using Windows server editions (Windows 2008, 2012, 2016).
Installation
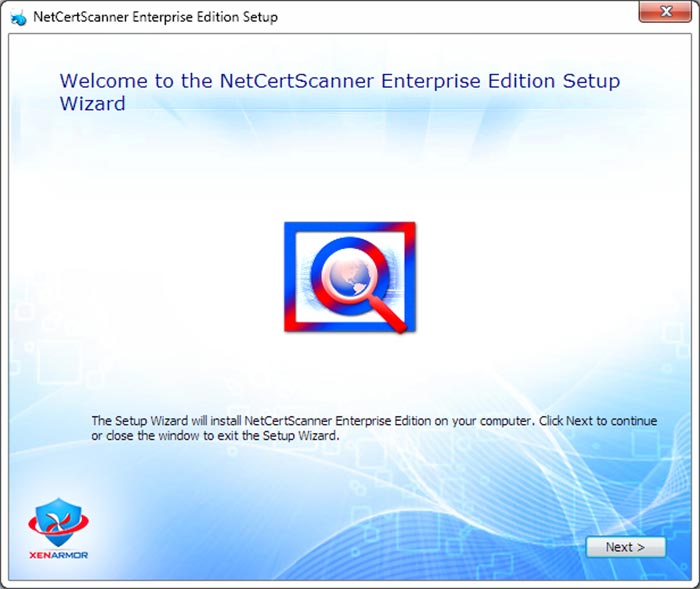
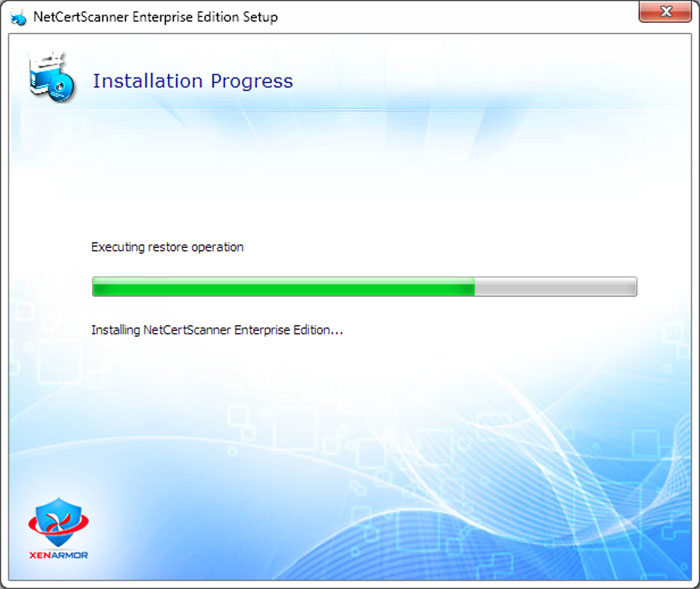
XenArmor NetCertScanner comes with standard windows installer which allows seamless installation & un-installation.
Launch the setup file and follow on-screen instructions to complete the installation as shown below,
You can uninstall it from the Control Panel or click on Uninstaller from Installed location of NetCertScanner
How to Use?
XenArmor NetCertScanner is one of the best & fastest SSL Certificate Scanner available on planet. It helps you to perform Single Host, Network or File based IP List scan with a click of button. Below are more details of each type of scanning operations,
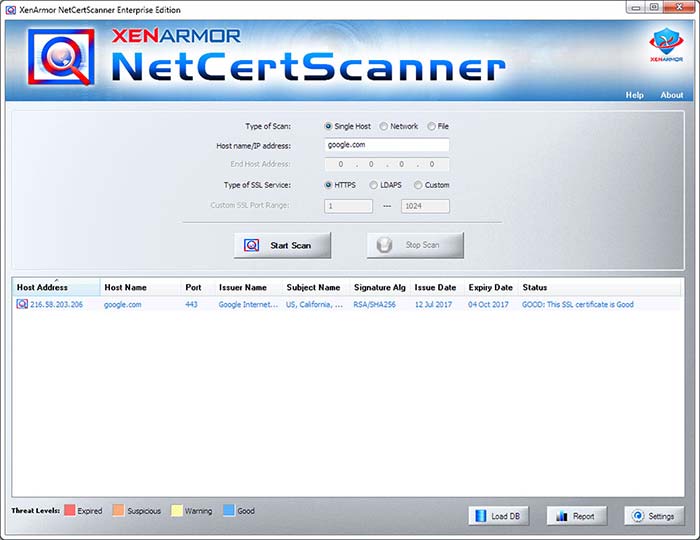
Single Host SSL Scan
This is helpful to perform SSL certificate scan of Single host. Just select ‘Single Host’ scan and enter IP address or Host name and click on ‘Start Scan’ button as shown below,
Network SSL Scan
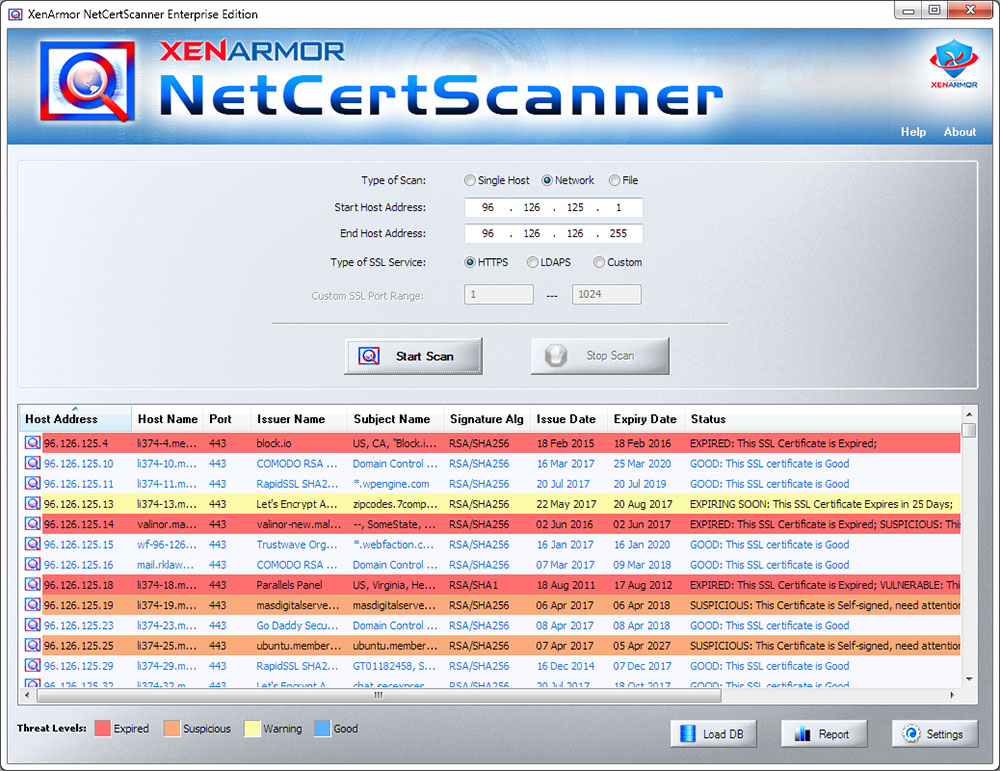
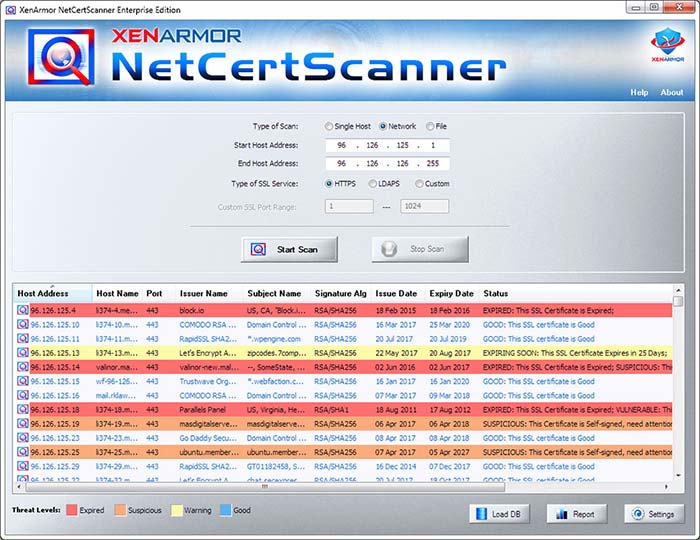
Network scan helps you to scan your entire network to find any expired, expiring soon, self-signed, suspicious or vulnerable SSL certificates. Enterprise Edition allows you to scan 256*256 Hosts (*.*.0.0/16) at a time. However Standard & Professional Edition allows you to scan only 256 Hosts (*.*.*.0/24) at a time
To perform Network scan just select ‘Network’ scan option in NetCertScanner, next enter the IP address range and then click on ‘Start Scan’ button to begin the SSL scanning as shown below
File IP List SSL Scan
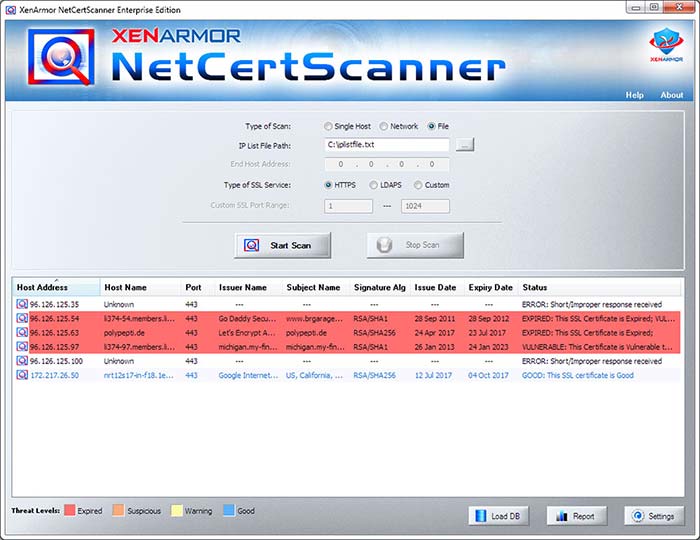
This feature helps you to scan only listed hosts/systems (IP Address or Domain Name (since 2019 edition) ) specified in the File. This is very useful when you have your servers scattered across different subnet or internet making the scanning operation faster and efficient.
To use create a simple text file with each containing one IP address or Domain Name of server. Then in NetCertScanner, choose ‘File Scan’ from the top, then select that IP address list File to begin the Scanning operation as shown below,
Custom SSL Port Scan
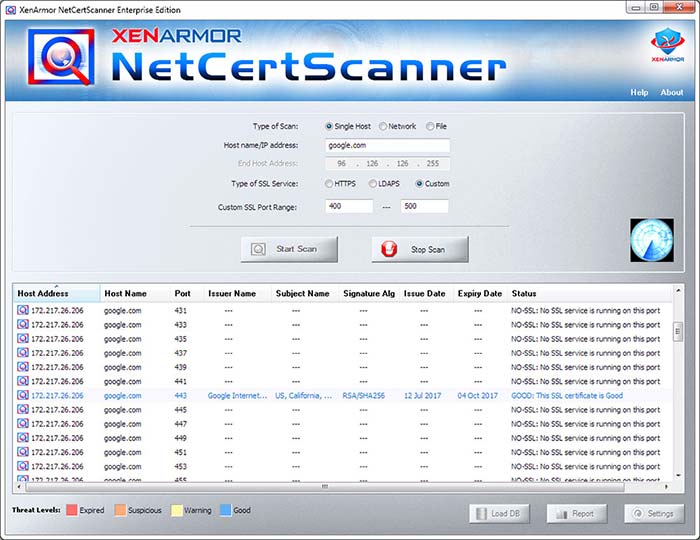
Custom port scan feature is very useful when your SSL services are running on non-standard ports (perhaps for security reasons). It can also be used to detect any hidden malicious SSL services run by Hacker.
To perform Custom SSL Port Scan, just select Type of Scan (Single, Network, File) and then choose ‘Custom’ from ‘Type of SSL Service’ option. Next enter the custom Port range and begin the scan as shown below,
Right Click Menu Options
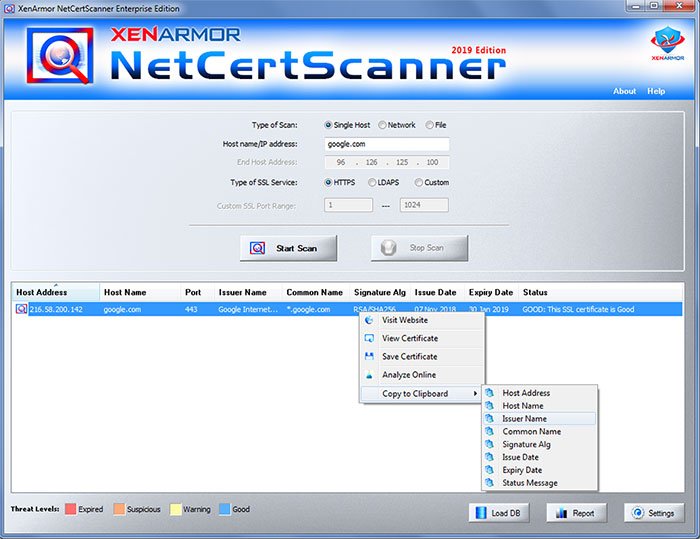
Right click context menu allows you to quickly & easily perform useful tasks in Certificate list after the completion of scan. You can choose to Visit Website, Open/Save Certificate, Analyze SSL Online or Copy various SSL Certificate details from the list as shown below,
You can also double click on each entry to view the SSL Certificate.Note that Right click menu option is not available while SSL scanning is in progress.
Settings – NetCertScanner
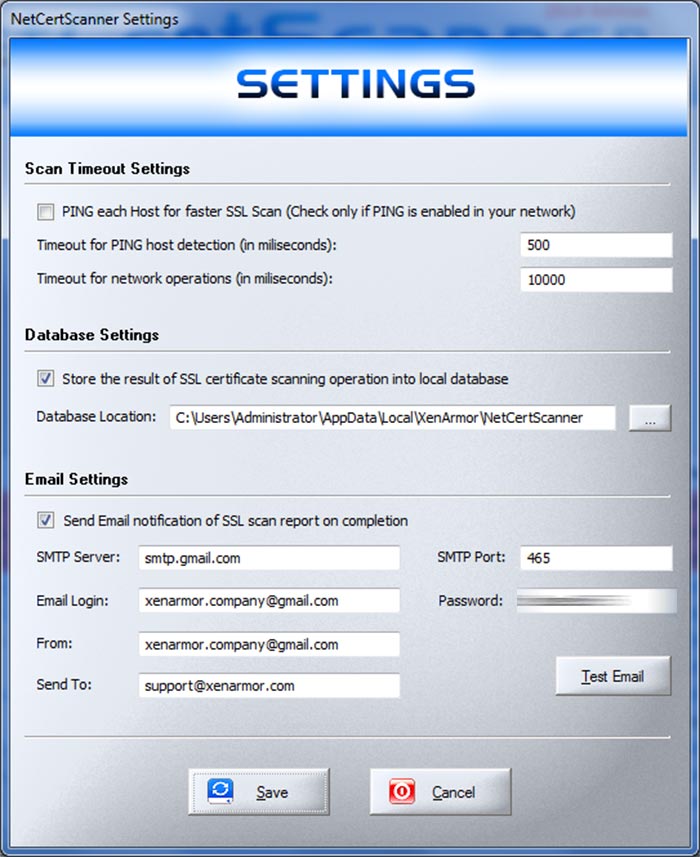
Settings option allow you to tweak various Timeout, Database & Email Notification related options as shown below,
Timeout Settings
Here you can adjust various Timeout settings based on your target server locations (like local subnet or Internet)
For local subnet you can select option ‘Ping Each Host before SSL Scan’. Not recommended for Servers outside subnet or Internet. Also you can set the Timeout value for host and network operations as follows,
- Local Network/Subnet
- Select ‘Ping Each Host before SSL Scan’
- Timeout for Host Detection: 500 ms
- Timeout for Network Operations: 5,000 ms
- Internet
- Don’t Select ‘Ping Each Host before SSL Scan’
- Timeout for Host Detection: 500 ms
- Timeout for Network Operations: 100,000 ms
These are standard timeout values, you can increase or decrease as per your network speed & traffic conditions.
Database Settings
XenArmor NetCertScanner offers seamless Database integration feature which automatically stores all the SSL Certificate scan information to local database for every scan. It is enabled by default.
To enable/disable Database feature simply check or uncheck ‘Store the result of scanning…..to database’ in the Setting dialog as shown above. If you have enabled Database then you can select the location where all the Database snapshot will be saved for each scan.
Note that even the NetCertScanner Console version uses the same settings automatically.
Email Settings
XenArmor NetCertScanner 2019 edition offers new Email Notification feature which helps you to automatically get full report of SSL scan in your Email immediately after each scan. This is very useful feature which can help you to fully automate your SSL scan using command-line version sending email notification.
To enable/disable Email notification feature simply check or uncheck ‘Send email notification…..’ in the Setting dialog as shown above. Once you enable it, you can set various Email settings and then click on ‘Test Email’ button to verify if the email is sent successfully or not.
Important Note: For security reasons we recommend creating test email account in Gmail (or similar) and use it here to send email.
Also if you are using gmail account, make sure to switch on “Allow less secure apps” for your email account as explained here. Else Gmail will block sending email. Also Database Storage needs to be enabled for Email notification to work.
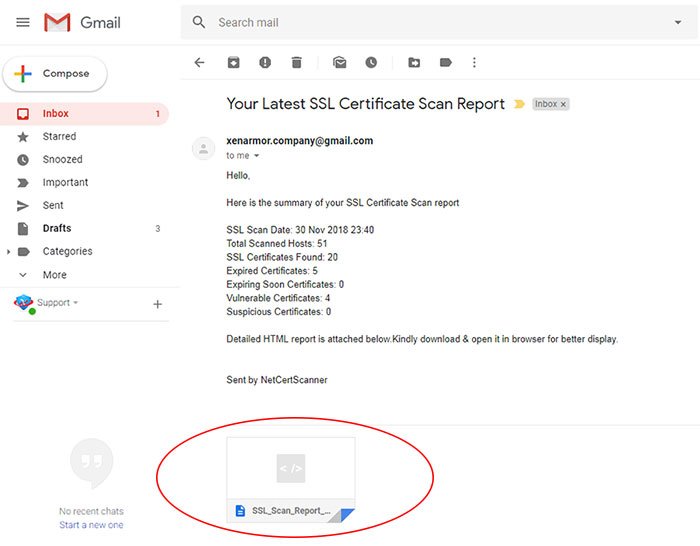
Here is the real example of Email notification of SSL Scan summary along with attached report
Note that NetCertScanner Console version uses the same settings automatically.
This Email Notification feature is available only in Enterprise Edition.
SSL Certificate Scan Report
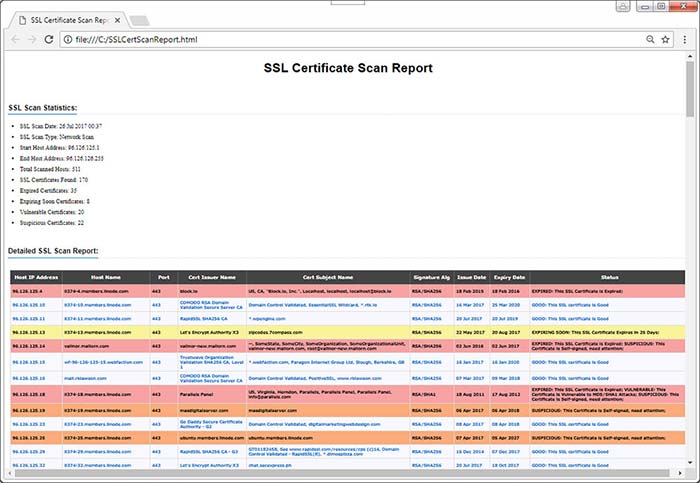
XenArmor NetCertScanner helps you to generate detailed SSL certificate Scan Report in HTML, CSV, XML, JSON, SQLite format. On complete of scan, click on Report button and then select the Type of Report (HTML or CSV) from the File Save Dialog as shown below,
Here is the sample of HTML report of SSL Certificate Scan,
Advanced Feature – SSL Certificate Security Analysis
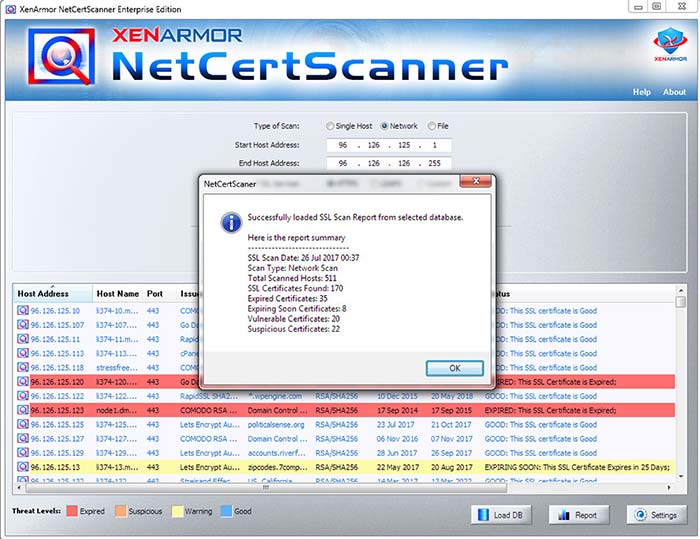
XenArmor NetCertScanner helps you to perform security analysis of SSL Certificates discovered during the scan. Not only helps you to find out Expired SSL certificates but also identifies Self-signed, Suspicious & Vulnerable SSL Certificates. Also each of these threats are represented in different color codes making the analysis faster and easier.
Here is the screenshot of SSL certificate analysis performed by NetCertScanner,
Here are more details on each threats and respective color codes,
- Expired – SSL Certificate is already expired: Red Color
- Expiring Soon – SSL Certificate expires within a month: Yellow Color
- Vulnerable – SSL Certificate is vulnerable to MD5/SHA1 Attacks: Red Color
- Self-Signed/Suspicious – SSL Certificate is self-signed or suspicious – Brown Color
- Good – This is good SSL Certificate – Blue Color TextSame color codes are used in both GUI list as well as in HTML report.
This feature is available only in Professional & Enterprise Edition
Special Feature – Automatic Storing of Database
XenArmor NetCertScanner offers seamless Database integration feature which automatically stores all the SSL Certificate scan information to local database for every scan. NetCertScanner uses independent Database (SQLite) snapshots to make whole process smoother and easier without the need for you to install or configure any third party Database software’s (MSSQL, MySQL, Oracle)
For every scan, NetCertScanner stores the complete scan details including SSL Certificate data to the separate Database file. You can control various Database settings including the location where all the files are stored through Settings.
Anytime later, you can view entire SSL Scan report by just loading Database into NetCertScanner. To load database, you can simply drag & drop file or click on “Load Database” button and select the file as shown below,
Database store feature will be very useful for Auditing and Automation of SSL Certificate Scan.
How to Use Command-line Version?
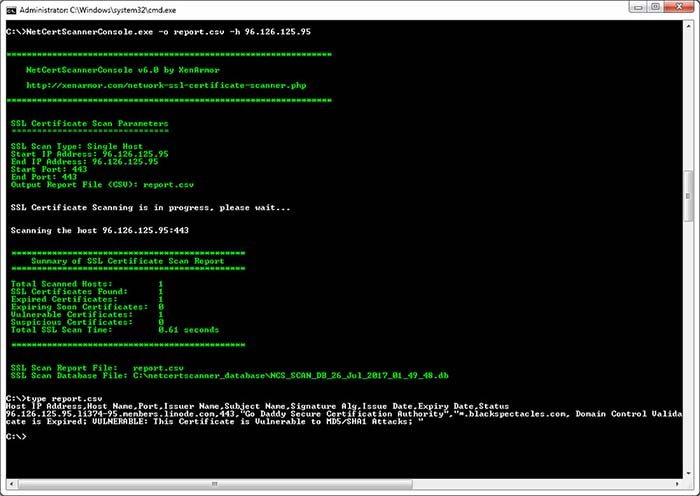
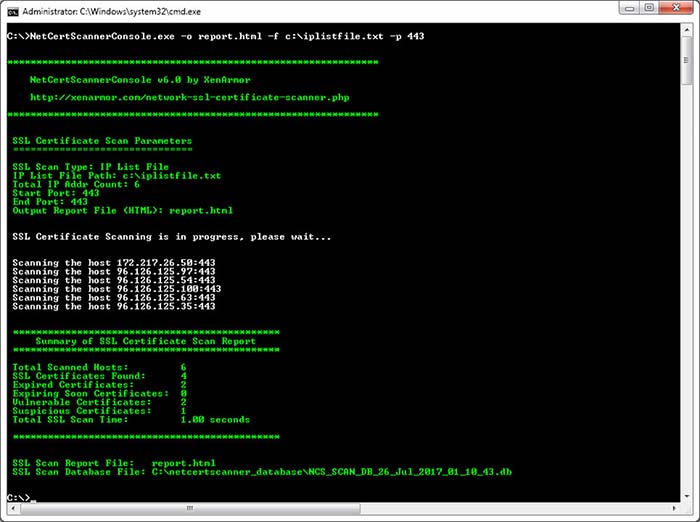
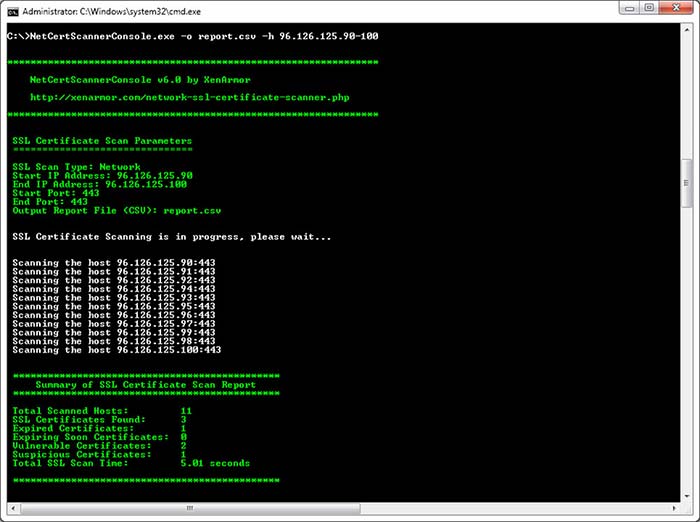
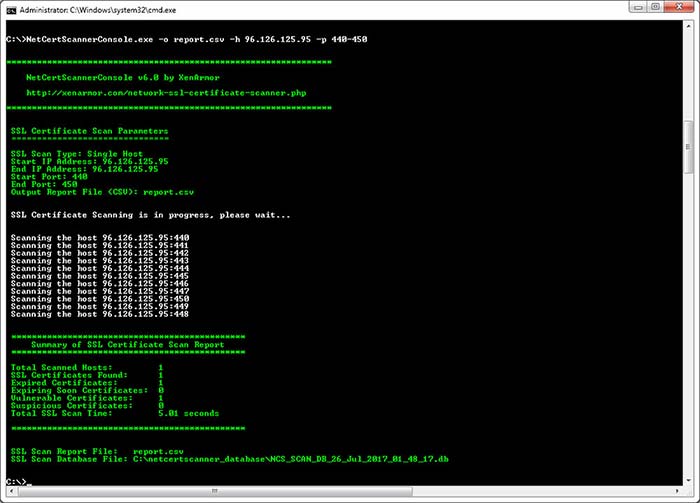
XenArmor NetCertScanner Command-line version (available in Enterprise Edition only) helps you to fully automate your entire SSL Certificate Scanning operation. It can also help you to integrate SSL scanning in your scripts giving you greater power and flexibility.
Here are the detailed screenshots of different type of SSL Scan,
Here is the command-line options & examples
- NetCertScannerConsole.exe [-o ] [-h host/host-range | -f ] [-p port/port-range]
- .
- // Single host scan with HTML report
- NetCertScannerConsole.exe -o output.html -h 192.168.5.1 -p 443
- .
- // Perform Network Scan of 256*256 hosts with CSV Report
- NetCertScannerConsole.exe -o c:\output.csv -h 192.168.0.0-255.255 -p 443
- .
- //Append (-oo) output report to existing CSV file
- NetCertScannerConsole.exe -oo output.csv -h 192.168.2.0-255 -p 443
- .
- //Scan *.*.0.0/16 Hosts with XML report
- NetCertScannerConsole.exe -o c:\output.xml -h 192.168.0.0-255.255
- .
- //Scan Port Range on Single Host with JSON report
- NetCertScannerConsole.exe -o c:\output.json -h 192.168.5.1 -p 1-1024
- .
- //Scan *.*.0.0/16 Hosts with SQLite database report
- NetCertScannerConsole.exe -o c:\output.db -h 192.168.0.0-255.255
- .
- // Custom Port Scan with range of ports
- NetCertScannerConsole.exe -o c:\output.html -h 192.168.5.1 -p 1-1024
- .
- // Custom Port Scan on entire network.
- NetCertScannerConsole.exe -o c:\output.html -h 192.168.5.1-254 -p 900-1000
- .
- // Scanning List of IP Addresses from Input File
- NetCertScannerConsole.exe -o “c:\my reports\out.csv” -f c:\iplist.txt -p 443
- .
- // Custom Port Scanning with List of IP Addresses from Input File
- NetCertScannerConsole.exe -o c:\report.csv -f c:\iplist.txt -p 1-1024
By default it will generate report in HTML format. You can specify csv, xml, json or db extension to output file to generate report in CSV, XML, JSON or SQLite format respectively.
Important Note: Console version automatically uses the same Timeout & Database options configured through Settings in NetCertScanner GUI version.
Note that Command-line version is available only in Enterprise Edition.
Automation of SSL Certificate Scan
XenArmor NetCertScanner Console Version helps you to completely automate your entire SSL Certificate Scanning operation. Now with 2019 edition, you can also get Email Notification with detailed SSL Report delivered to your email. For each scan, it can store entire SSL certificate details including Certificate to local database.
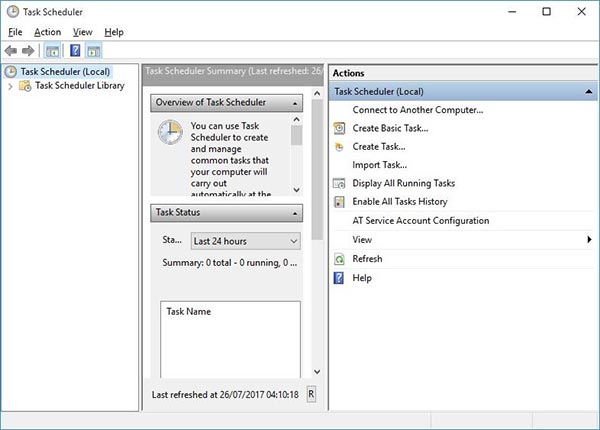
Here are simple steps to automate SSL scanning process using Windows Scheduler.
1) Launch Windows Task Scheduler from Administrative Tools in Control Panel. Next click on “Create Basic Task” on right side panel as shown below,
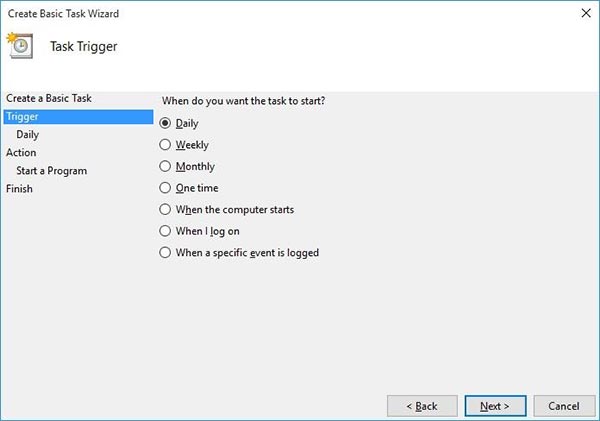
2) On the Basic Task page, enter name as ‘NetCertScanner SSL Scan’. On next page select ‘Daily or Weekly or Monthly’ with appropriate Time settings as per your need.
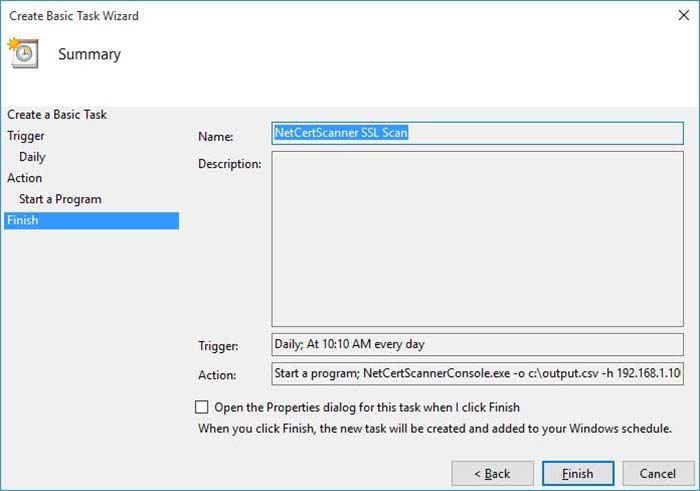
3) Next on the ‘Action’ Page, click on Start Program and then enter command & arguments as shown below,
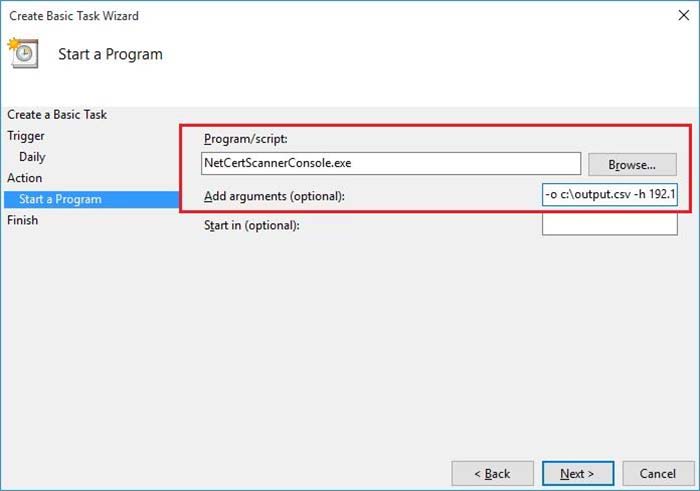
For more command-line options refer to NetCertScanner Command-line Version section.
4) Finally click on Finish button to schedule the automatic SSL Scanning operation.
Note that before you schedule, configure the Timeout & Database options through NetCertScanner Settings. Also during every scan output report file will be overwritten. If you want, you can add additional scripts to move it to different folder. However using the stored database for each scan you can generate detailed report anytime.
Contact XenArmor
Have any more queries or need any technical clarification? Just write to us at support@xenarmor.com and you will have response within 24 to 48 hours.
For more details visit home page of XenArmor NetCertScanner
Recommended Posts

User Guide – Windows Defender Manager Pro 2025 Edition
October 9, 2025

User Guide – Windows Asterisk Password Pro 2025
August 11, 2025

User Guide – MAC IP Scanner Pro 2022
July 18, 2025
