Product Guide – Android Password Forensics Pro 2025 Edition
Contents
- About
- Supported Devices
- Supported Apps
- Benefits
- Requirements
- Activation
- How to Use?
- Fixing Android Device Connection Problem to Computer
- Right Click Menu Options
- Settings
- Password Recovery Report
- How to Use Command-line Version
- Advanced Feature – Recover from Custom Profile Location
- Automation of Android Password Recovery
- Frequently Asked Questions
- Version & Release History
- Contact XenArmor
- Useful Links & Resources
About
![]()
![]() XenArmor Android Password Forensics Pro is an enterprise-grade software designed to instantly recover passwords and system secrets from any Android device.
XenArmor Android Password Forensics Pro is an enterprise-grade software designed to instantly recover passwords and system secrets from any Android device.
You can perform password recovery by directly connecting your Android device to a computer. Alternatively, you can copy your mobile data onto your computer and recover passwords from there.
This software supports all types of Android devices including tablets, watches, and smartphones from all brands such as Samsung, Xiaomi, Huawei, Vivo, Oppo, Realme, Motorola, and OnePlus.
It can be a valuable addition to your forensic toolkit. Specifically, it can be very handy tool for cybercrime police, forensic investigators, technicians, govt law enforcement, military & intelligence agencies.
Recover from All Android Devices
Support all type of android devices like Mobile, Tablet, TV, Watch from popular brands.

Recover 70+ Android App Passwords & Secrets
Instantly recover popular app passwords & system secrets from Android device.
Recover Passwords from 50+ Android Apps
|
|
|
Recover Android System Secrets
|
|
Important Note: Android System Secrets can be recovered from non-rooted Android device. But recovery of app passwords is possible only from rooted device or backup data copied to local computer.
For more details, refer to Three Ways to Recover Passwords from Any Android Device
Note: For Chrome browser, recovery is supported up to v132 (Jan 14, 2025). Newer versions store passwords in ‘Google Password Manager’.
If you like us to support password recovery from your favorite Android app in the next release please submit your request here.
Benefits
Here are the main benefits for you,
- Instant recovery of passwords from 50+ Android apps
- Find Android System Secrets from mobile phone
- Recover Website, Email, Social Network, FTP, File Manager, Wi-Fi Passwords
- Recover passwords directly from Android device
- Recover passwords from Android mobile data copied to local computer
- Recover passwords from profile location of specified Android app
- Command-line options to run it directly from any scripts/programs
- Automate password recovery using Task Schedular
- Backup passwords to HTML,CSV,XML,JSON or SQLite file
- Forensic-Ready: All operations done without leaving any file trace/fingerprints
- Unlimited Edition (100% Portable): Run directly from USB disk
- EV Code Certified by SECTIGO: Enhanced trust & reduced Antivirus false positive warning
- Support all type of Android devices like Tablet, Watch, Mobiles (Samsung, Xiaomi, Huawei, Vivo, Oppo, Realme, Motorola, OnePlus etc)
- Support all Android devices from v10 to latest v15 (Vanilla Ice Cream)
- Supports All Windows PCs (Vista to new Windows 11)
Requirements
XenArmor Android Password Forensics Pro works on both 32-bit & 64-bit platforms starting from Windows Vista to Windows 11.
Also it supports recovery of Android devices starting from v10 to latest v15.
Here are the specific details,
- Installation Size: 8 MB
- RAM: 4 GB+ Recommended
- Android Version: v10 to latest v15 (Vanilla Ice Cream)
- Operating System: Windows 11,10,8,7,Vista, Windows Server 2022,2019,2016,2012,2008 (32-bit/64-bit)
Activation
First time when you launch your software it will show activation screen as follows,
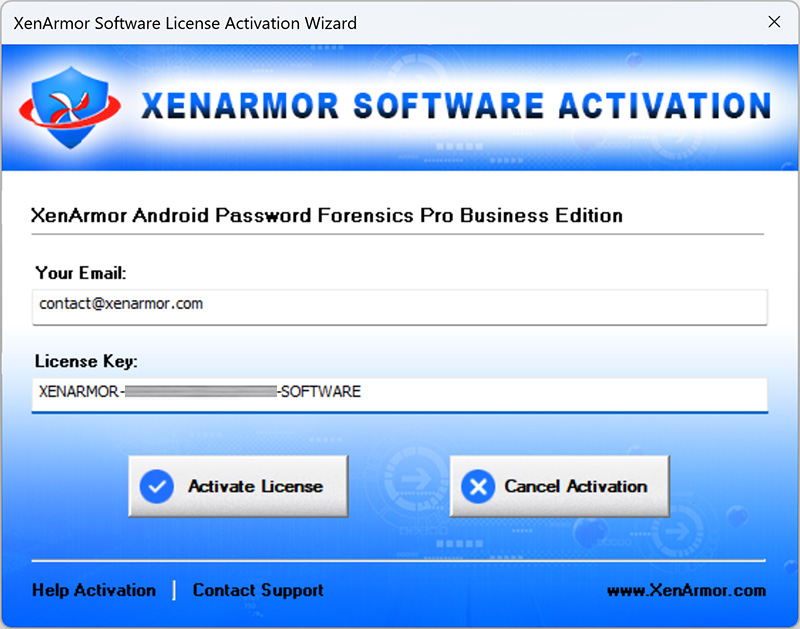
Here you can enter your order email & license key to register & activate it.
How to Use?
“XenArmor Android Password Forensics Pro” is designed for simplicity and ease of use. Just launch the software and click on the “Recover Passwords” button to begin.
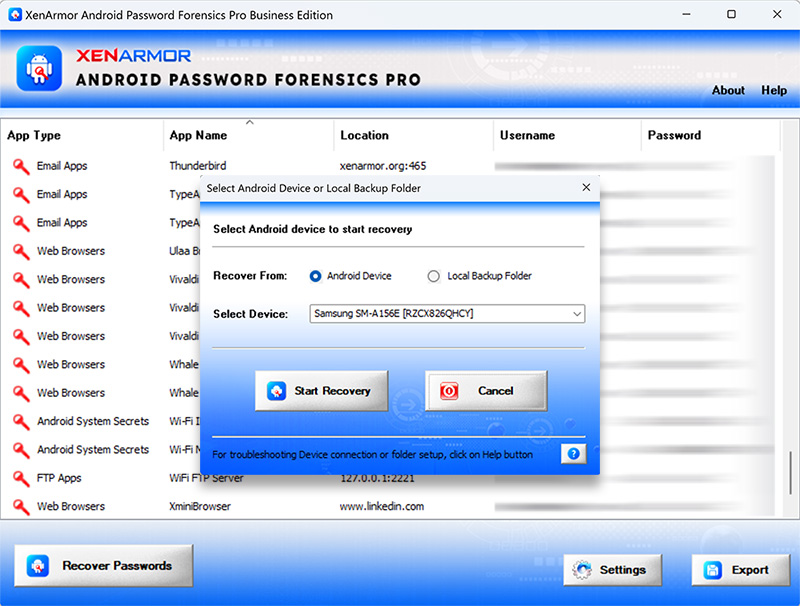
You’ll see an input selection screen where you can choose to recover passwords either from your Android device directly or from a backup folder.

Below are clear instructions for each method.
Option 1: Recover from Local Backup Folder
To recover passwords from backup data, you’ll first need to transfer the appropriate data from your Android mobile device to your computer. Typically, Android apps store passwords in the /data/ folder (which requires root access, see details below), while few apps store data in the /sdcard/ folder.
Follow these simple steps:
- First, copy the necessary folders (/data/ and /sdcard/) from your Android device to computer (e.g., D:\android_backup\).
- Ensure the copied folders are correctly placed, for example:
- D:\android_backup\data\
- D:\android_backup\sdcard\
- Now enter this backup folder path into the “Input Folder Location” field (see above screenshot)
- Click “Start Recovery” to retrieve passwords from your mobile backup data.
Note: This method recovers only app passwords from backup mobile data. To retrieve system secrets, you must directly access the Android device (see Option 2 below).
By default, Android’s security framework restricts access to the /data/ folder. Only user with root privileges or rooted mobile devices can access this folder.
To copy this Android mobile data for successful recovery, refer to our guide
Option 2: Recover Directly from Android Device
Before recovering passwords from your Android device, ensure you’ve completed preliminary steps such as enabling USB debugging & gaining Root access if possible.
Follow these detailed steps,
- Enable USB Debugging on your mobile device (see details here)
- Next, gain Root access by Rooting Mobile Device or using privilege escalation exploits (see details here)
- Without Root access, you will be able to recover only Android System Secrets (& some passwords)
- Next, connect your Android device to your computer using a USB cable.
- Now in your Xenarmor software, select “Android Device” from the input options (see above screenshot)
- Choose your mobile from the dropdown list. If your device isn’t detected, follow troubleshooting steps here
- Click on “Start Recovery” to begin extracting passwords and system secrets as shown in screenshot below.
After clicking “Start Recovery”, the software will recover all the passwords & secrets as shown below,
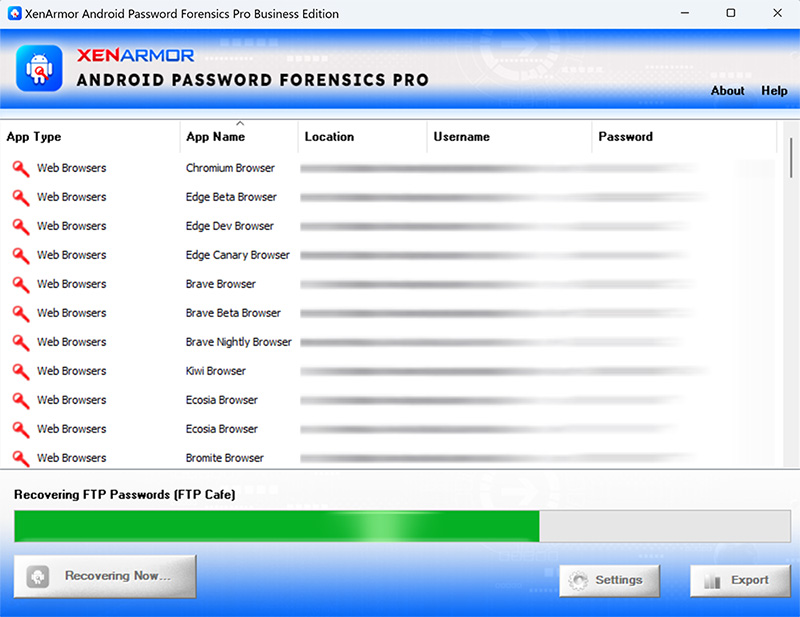
You can easily sort the displayed password list by clicking on the corresponding column headers, such as App Type, App Name, Location, Username, or Password.
On Android device, successful password recovery requires access to the /data/ folder which is restricted to Root-level users.
So password recovery is possible under these conditions:
- Your Android device is Rooted.
- You have obtained Root access through privilege escalation or exploits.
- Data extraction via forensic tools like Cellebrite UFED, MSAB XRY, JTAG, or Chip-Off methods.
For detailed instructions, refer to our guide
Three Ways to Recover Passwords from Any Android Device
Fixing Android Device Connection Problem to Computer
If your Android mobile device is connected to your computer but isn’t detected by the software, don’t worry. This is a common issue, especially during initial setup.
You can easily resolve it by following the steps provided in our guide below
Right Click Menu Options
Right click context menu helps you to quickly & easily copy various fields (such as App Name, Website/Server, Username, Password etc).
Also you can quickly test the recovered password by clicking on “Open Location” to launch the website.
Settings
Settings Panel allows you to tweak & customize password recovery operations as per you need. Mainly it helps you to select app type for recovery as well as specify custom profile path for selected app.
To launch, simply click on ‘Settings’ button from the main GUI screen and you will see the Settings Panel as shown below,
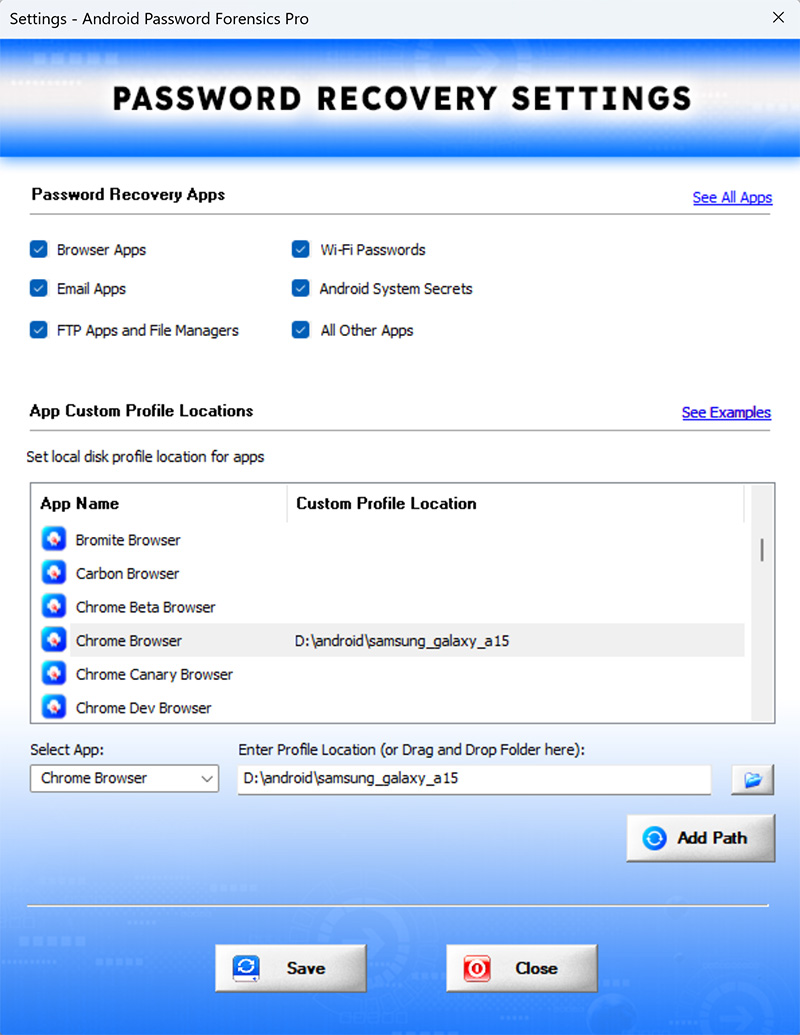
Refer to below sections for more details on each of the sections in Settings screen.
Settings – Password Recovery Options
First section in Settings screen helps you to select or deselect type of apps to recover passwords from.

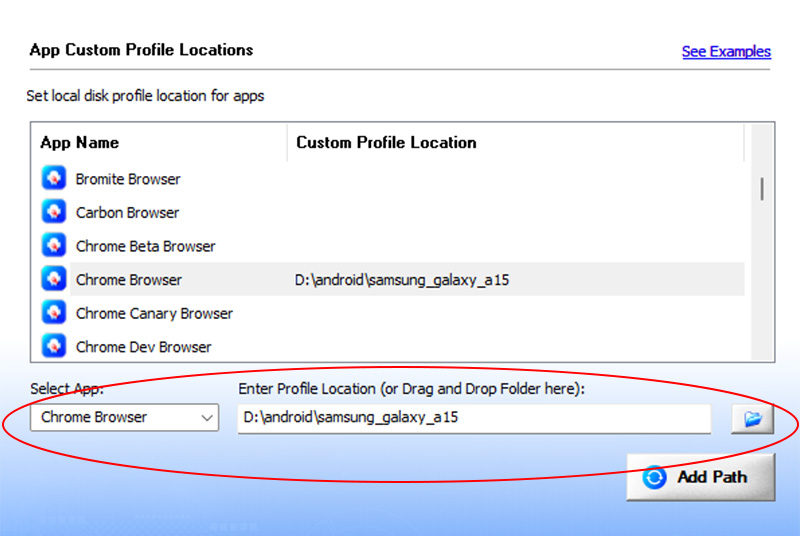
Settings – Customize Application Profile Path
This is one of the unique benefits of XenArmor Android Password Forensics Pro. It helps you to specify the custom profile locations for Apps.
This is useful when App is using different profile location (instead of known old location) or directly connecting to Android device is not possible.
In such case, copy the app data from Android Device (E.g. Chrome data location /data/data/com.android.chrome) to local folder (E.g. D:\android_data\com.android.chrome)
Now select Chrome Browser (as shown & explained below) and specify custom location (E.g. D:\android_data\com.android.chrome)
To Find Password Location of Your Android App, See Article Below
Password Location, Secrets & Recovery of Popular Android Apps
Here are simple steps to add/edit/remove custom app locations
- In the Settings screen, go to second section “Application Profile Locations”
- Now to ADD custom app location, double click on application in the List or select the application from selection box
- Next you can enter the location manually or click on browse button or simply drag & drop the folder
- Finally click on “Update Location” to add the Path for this application
- To EDIT custom app location, select the application from selection box or double click in the List
- Now you can edit it or select new path by clicking on browse button or simply drag & drop the folder
- To Remove custom app location, right click on the application in the List and click on “Remove Profile Location”
All changes to Custom Locations are saved automatically. Once done, you can go back to main screen, click on “Recover Passwords” to recover all passwords from new custom app locations.
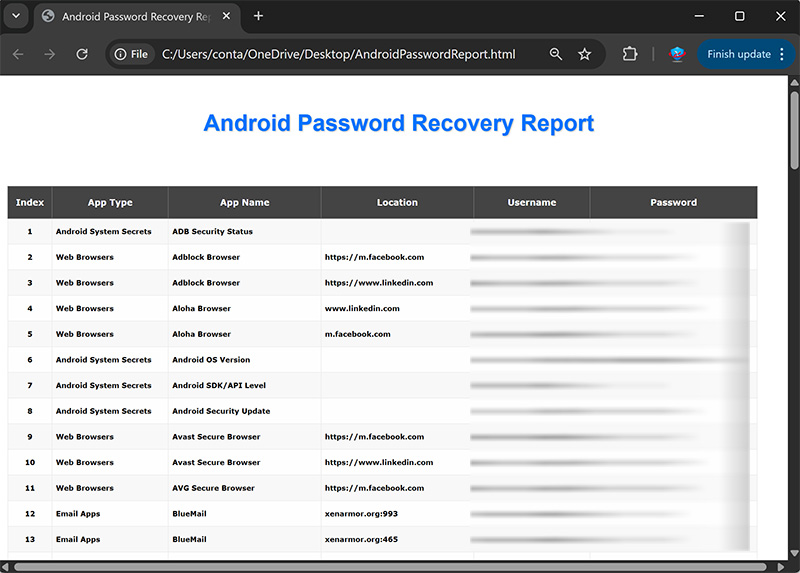
Password Recovery Report
XenArmor Android Password Forensics Pro helps you to generate detailed report in HTML, CSV, XML, JSON or SQLite Database format.
To generate report, after the password recovery, click on ‘Export’ button and then select the Type of Report (HTML, CSV, XML, JSON, SQLite) from the ‘File Save Dialog’.
Here is the sample of HTML Password Report,
How to Use Command-line Options?
XenArmor Android Password Forensics Pro also supports command-line options. It helps you to fully automate password recovery or directly integrate it within your scripts or programs.
Here is the screenshot of using Command-line options
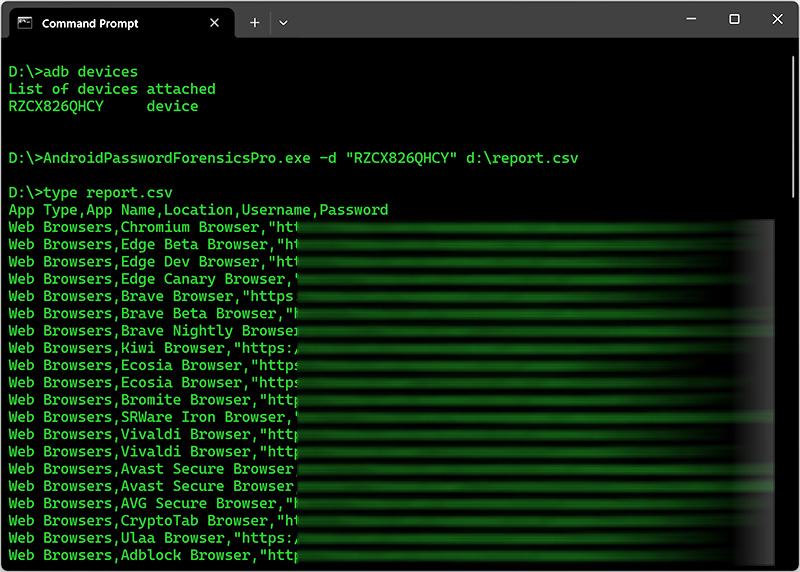
Here are various command-line options & examples
- AndroidPasswordForensicsPro.exe [-d device_id | -f folder_path] [report_filename]
- .
- //Recover from Android Device & Save the Password Report in HTML format
- AndroidPasswordForensicsPro.exe -d RZCX826QHCY D:\report.html
- .
- //Recover from Local Folder & Save the Password Report to CSV file
- AndroidPasswordForensicsPro.exe -f D:\android_data D:\report.csv
Few useful tips on using Command-line option
- To get Android device id (to use with -d option), type cmd “adb devices” from installation location (as shown in screenshot above)
- Do not use any space in folder path or report file location.
- By default it will generate report in HTML format. You can specify CSV, XML, JSON or DB extension to Report Filename to generate report in CSV, XML, JSON or SQLite database format.
- To catch any error, run DebugView.exe before starting command-line. It will capture & show any errors in command-line input.
Advanced Feature – Recover from Custom Profile Location
XenArmor Android Password Forensics Pro supports “Custom Profile Location” feature helping you to recover passwords from specific App.
This is useful when App is using different profile location (than standand or old one) or directly connecting to Android device is not possible.
In such case, you can copy the profile data of App to local computer and specify the folder location for recovery.
For more details, refer to “Settings – Custom Profile Path Section”
Automation of Password Recovery
XenArmor Android Password Forensics Pro includes command-line options that can help you to completely automate password recovery operations daily or periodically. It can generate detailed report in CSV, XML, JSON or HTML format which can be used for future auditing or backup purposes.
Here are simple steps to automate Android Password Recovery using Windows Task Scheduler.
1) Launch Windows Task Scheduler from Administrative Tools in Control Panel. Next click on “Create Basic Task” on right side panel as shown below,
2) On the Basic Task page, enter name as ‘Android Password Recovery’. On next page select ‘Daily or Weekly or Monthly’ with appropriate Time settings as per your need.
3) Next on the ‘Action’ Page, click on Start Program and then enter command & arguments as shown below,
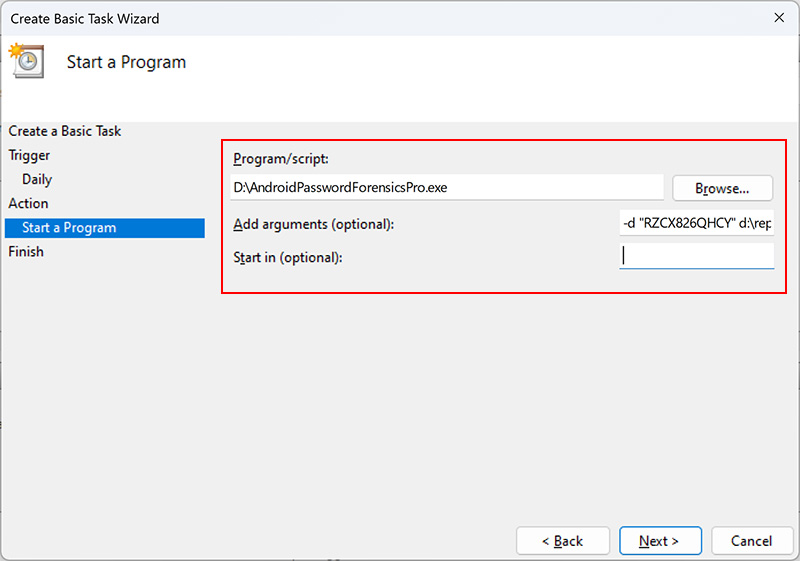
For more command-line options refer to Android Password Forensics Pro Command-line Version section.
4) Finally click on Finish button to schedule the automatic Android Password Recovery operation.

Frequently Asked Questions
You can easily fix it by following the step-by-step solution here
Our team is contstantly upgrading it, so you can request for your app to be added in next release.
There are multiple ways to gain Root privileges on your Mobile as explained in this guide
Please follow simple steps listed here to copy the right data to your PC & specify it correctly in the software.
Version & Release History
Note: To get download link of latest update please contact our support team with your order details.
Version 3.5 (2025 Edition): 3 Aug 2025
Minor update to 2025 edition with enhanced GUI interface, improved HTML report, status text display etc. Integraded new license managed for fail-proof activation. Also added latest ADB modules for improved Android device connection.
Version 3.0 (2025 Edition): 17 May 2025
Important release with following key updates,
- Improved password recovery for apps like Chrome, Aloha, Soul browser etc
- Restructured password modules for enhanced performance
- Enhanced user interface with new icons for all buttons
- Optimized database access and code for faster execution
- Updated latest ADB modules for better connectivity with Android device
Version 2.0 (2025 Edition): 23 Mar 2025
Mega release with following updates below,
- Recover 25+ Android System Secrets
- Detect & load all Android devices in thread
- Displays loading status & error message in input window
- Added help links for both device & folder in input window
- On non-rooted devices, continue recovering other passwords & system secrets
- Improved GUI interface with new icons
- Added Mobile_Backup_Sample folder to package for testing
Version 1.0 (2025 Edition): 8th Mar 2025
First public release
Contact XenArmor
Have any more queries or need any technical clarification? Just write to us at support@xenarmor.com and you will have response within 24 to 48 hours.
For more details visit home page of XenArmor Android Password Forensics Pro
Useful Links & Resources
- How to Enable USB Debugging on Android Mobile Device
- How to Fix Android Mobile Connection Problem with Your Computer
- Three Ways to Recover Passwords from Any Android Device
- Password Location, Secrets & Recovery of Popular Android Apps
Recommended Posts

User Guide – Windows Defender Manager Pro 2026 Edition
October 9, 2025
User Guide – Windows Asterisk Password Pro 2025
August 11, 2025
User Guide – MAC IP Scanner Pro 2022
July 18, 2025