How to Enable USB Debugging on Android Mobile Device

Often we need to enable “USB Debugging” on our Mobile to connect it to our local computer. This helps us to easily backup Mobile data, perform password recovery or advanced file management.
By default, “USB Debugging” is disabled on all Android devices. To enable it, first we need to enable “Developer Options” (which is hidden by default) and then switch on USB Debugging option.
Here are the quick & easy steps,
Step 1: Enable Developer Options
- Open Settings on your Android device.
- Scroll down and tap About phone.
- Tap Software information.
- Locate Build number and tap on it 7 times.
- You may need to enter your PIN, password, or pattern to confirm.
- You will see a message “Developer mode has been enabled”.

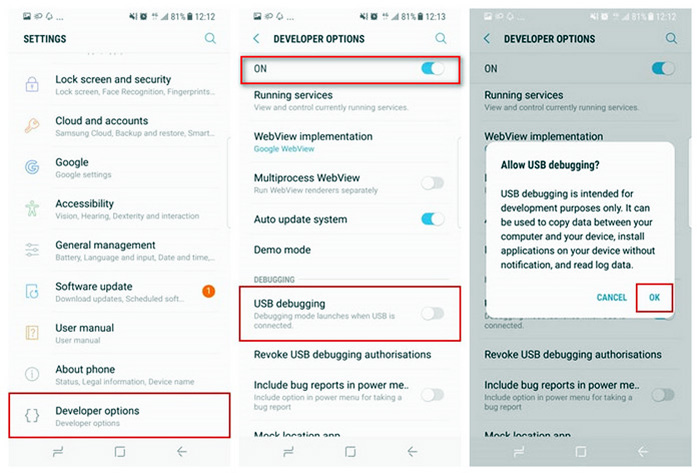
Step 2: Enable USB Debugging
- Now again open Settings on your Android device.
- Scroll down and tap Developer options (usually under System or Additional settings).
- Scroll down and find USB Debugging.
- Toggle the switch ON.
- Confirm by tapping OK on the pop-up message.
Step 3: Connect to a PC
- Plug your Android device into a computer via USB cable.
- A prompt may appear on your phone asking “Allow USB Debugging?”.
- Tap Allow (you can also check “Always allow from this computer” for future connections).
That’s all. Now you have successfully enabled USB Debugging.
Note: Above settings may slightly vary based your Android mobile company.
For specific steps for your mobile brand you can check here & here or ask ChatGPT “how to enable USB Debugging on Samsung Galaxy S25 mobile”
Recommended Posts

Three Ways to Recover Passwords from Any Android Device
March 5, 2025
How to Switch from PIN to Password Login on Windows
November 29, 2025